2017/08/11
1. 緣由
最近幾年 LoRa 很紅,使用這種技術的無線通訊模組 通常比較 便宜(使用免費頻段)、小、省電、通訊距離長 (~15Km),主要用來讓末端遠距的 IoT 設備能互相溝通 或 與主機交換資料。市面上的 LoRa 模組很多,最近入手的是 HopeRF 出的 RFM96W,其上搭載 SX1278 (相容)晶片體積很小 很迷人。
RFM96W 模組的外觀如下圖,大約只有 16mm x 16mm 見方,中間的正方形 IC 就是 SX1278 (相容)晶片 。
使用 Arduino 搭配 RFM96W 很快就可以做出一個可以收發資料的裝置,網路上有 SX127x library for Arduino 可以用,很方便。
如果是使用 Raspberry Pi 來主控,可以用 Python 搭配 pySX127x 來驅動 RFM96W。
但是我最近比較常用 ESP8266 + MicroPython ,pySX127x 太大了 無法在 ESP8266 上面使用,所以我只好用 Python 把 arduino-LoRa 改寫成 for MicroPython + ESP8266 的版本。
GitHub repo. 在這。
2. 效果
可以半雙工 互傳資料,很有趣,改天再來試試看能打多遠的距離。
LoRa 半雙工 互傳資料
使用 SX1278 + MicroPython + ESP8266
reboot 的時候 LED 會閃兩次
後續每收到一個 packet 的時候 LED 會閃一下
後續每收到一個 packet 的時候 LED 會閃一下
3. Config
RFM96W vs. NodeMCU 接腳對應
NodeMCU (ESP8266) pinout
接腳對應
接好大概就像這樣
4. 使用方式
簡單的收發測試方式:
- 按照上述的接腳對應方式準備兩組 NodeMCU+SX1278模組 (RFM96W)。
- NodeMCU (ESP8266) 燒錄 MicroPython 韌體。
- 由 GitHub 下載 檔案。
- 將下圖 DuplexCallback 資料夾中的檔案分別 全部上傳到兩組 NodeMCU上 (直接放在 根目錄之下即可)。
- 上電之後兩台 NodeMCU 應該就會開始互傳資料。
5. 使用 ESP32
ESP8266 內建 WiFi 連網的能力,這樣已經足以作為一個 Gateway 了,但是 ESP8266 的記憶體比較小 有時候不夠用,所以今天把其中一台改為使用 ESP32,程式也調整了一下 可以兼容。
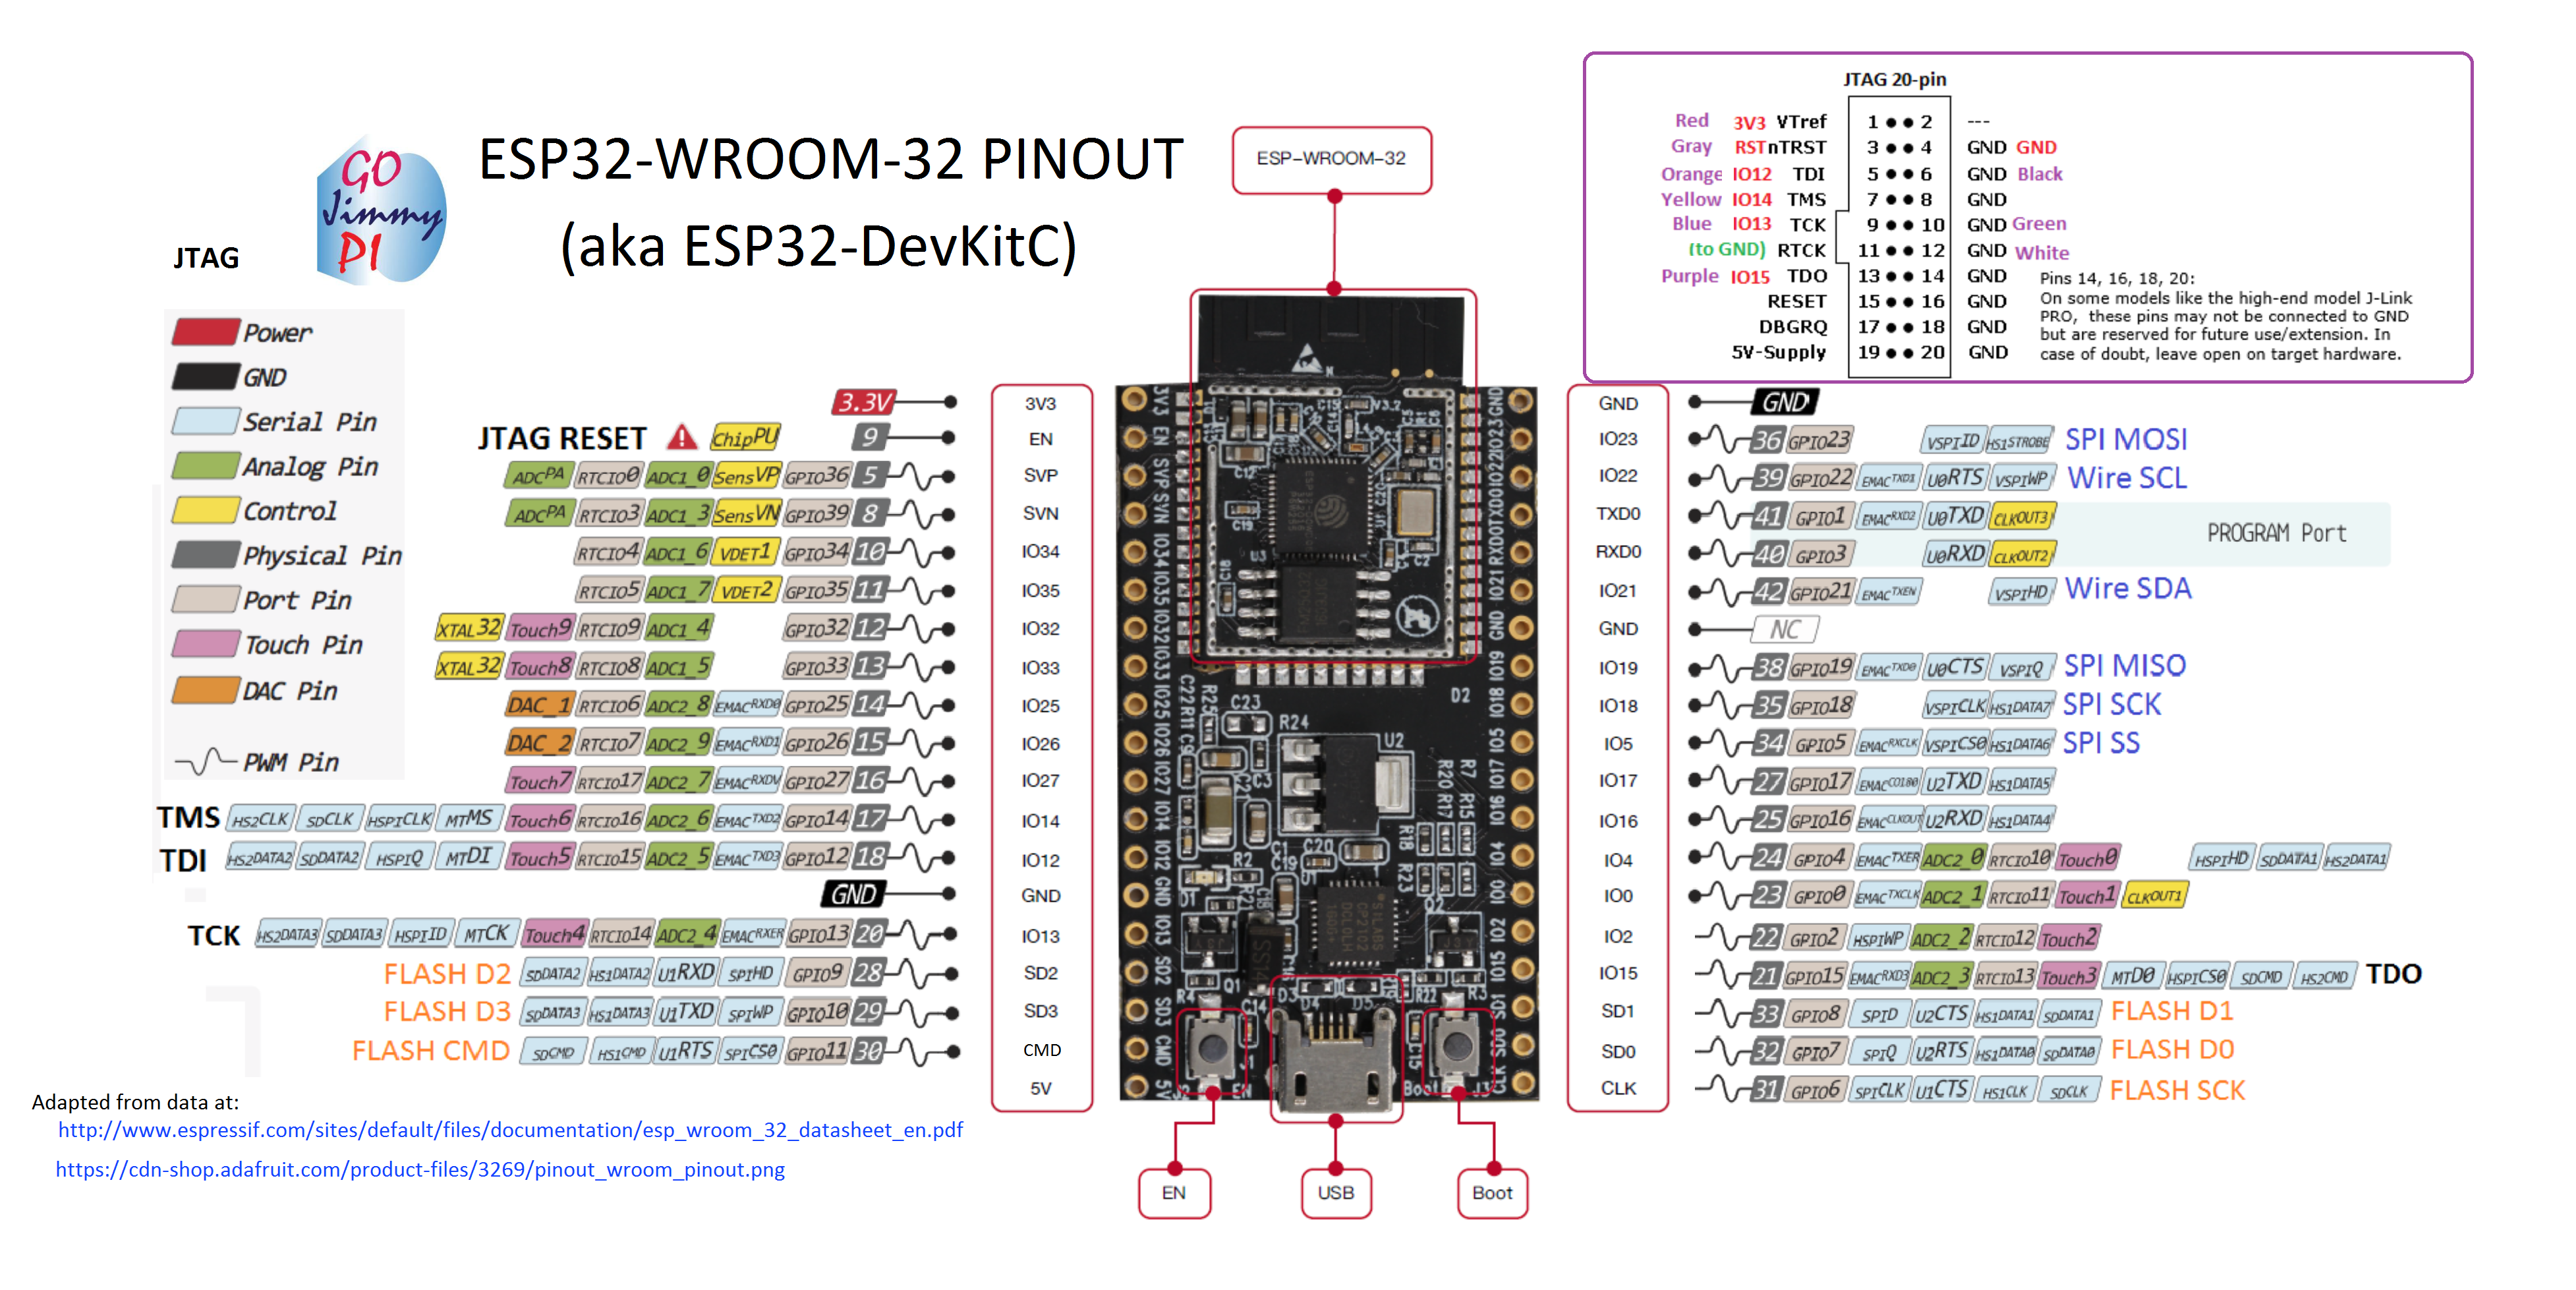
for ESP32 的 MicroPython 韌體 在這。
NodeMCU (ESP32) pinout
接腳對應
接好線 大概像這樣
6. 使用 Raspberry Pi
既然已經做到這邊,索性再多花一點時間兼容 Raspberry Pi,我是使用 Raspberry Pi Zero W。
以前一直沒有用 Raspberry Pi 實作硬體專案,這次剛好藉這個機會熟悉一下 RPi 的硬體介面操作。
Raspberry Pi 的 pinout
接腳對應
(這是對應 2017/09/02 之前的程式碼)
(這是對應 2017/09/02 之前的程式碼)
(這是對應 2017/09/02 之後的程式碼)
接好線 大概像這樣
(這是對應 2017/09/02 之前的程式碼,
之後已經調整 NSS和DIO0 的對應腳位)
(這是對應 2017/09/02 之前的程式碼,
之後已經調整 NSS和DIO0 的對應腳位)
LoRa 半雙工 互傳資料
ESP8266+ESP32+Raspberry Pi Zero W
- 要先 enable Raspberry 上的 SPI 介面。
- RPi 上需安裝:
- Python3
- sudo pip3 install RPi.GPIO
- sudo pip3 install spidev
- 按照上述的接腳對應方式接線。
- 由 GitHub 下載 檔案。
- 將下圖 DuplexCallback 資料夾中的檔案 全部上傳到 RPi 上的某一個資料夾中。
- cd 到該資料夾的位置。
- 在該資料夾中 執行如下的 Python 程式碼,RPi 就會開始半雙工收發資料 :
- sudo python3 main.py

7. 支援雙通道 (雙 transceivers)
看到網路上有人用 ESP8266 搭配兩個 LoRa transceivers 做成雙通道的模組,這倒是一個好主意,我也來改一下。
接腳對應 for ESP8266
接好線 大概像這樣
LoRa 雙通道 on ESP8266
接腳對應 for ESP32
接好線 大概像這樣
LoRa 雙通道 on ESP32
接腳對應 for Raspberry Pi
接好線 大概像這樣
- 要先 enable Raspberry 上的 SPI 介面。
- RPi 上需安裝:
- Python3
- sudo pip3 install RPi.GPIO
- sudo pip3 install spidev
- 按照上述的接腳對應方式接線。
- 由 GitHub 下載 檔案。
- 將所有的 *.py 檔案都複製到 RPi 上的某一個資料夾中。
- cd 到該資料夾中。
- 將 main.py 中 第 8 行的 "import test" 改為 "import test_dual_channels as test"
- 進入 Python3 環境:
- sudo python3
- 執行如下的 Python 指令,RPi 就會開始使用兩個 RFM96W 模組接收資料 :
- import main
8. 使用 TTGO 的 ESP32+LoRa+OLED 整合模組
網路上有賣這種 ESP32 + SX1278 LoRa + SSD1306 OLED 的整合模組,整體設計相當簡潔,目前的價格大約台幣 300元,以後可能更便宜。
為了兼容這個模組,特別加了一個 controller_esp_ttgo_lora_oled 的 subclass,並且將有使用到的 SSD1306 driver 含括進來。 雖然腳位定義不同,但已經都封裝在 controller 的子類別 (controller_esp_ttgo_lora_oled ) 中,所以應用的時候使用者可以如常使用 controller 所定義的 interface 即可,不需要去操煩底層實作的細節。
A. MQTT bridged LoRa networks with MicroPython on ESP32
有天想到可以用 蜂巢網路的模式,透過 MQTT 串聯分散在各地區的 LoRa networks,於是就做了 這個實驗。
網路上有賣這種 ESP32 + SX1278 LoRa + SSD1306 OLED 的整合模組,整體設計相當簡潔,目前的價格大約台幣 300元,以後可能更便宜。
為了兼容這個模組,特別加了一個 controller_esp_ttgo_lora_oled 的 subclass,並且將有使用到的 SSD1306 driver 含括進來。 雖然腳位定義不同,但已經都封裝在 controller 的子類別 (controller_esp_ttgo_lora_oled ) 中,所以應用的時候使用者可以如常使用 controller 所定義的 interface 即可,不需要去操煩底層實作的細節。
有個 display 還是比較方便一點,也許以後可以做個 LoRa 推文顯示器
有天想到可以用 蜂巢網路的模式,透過 MQTT 串聯分散在各地區的 LoRa networks,於是就做了 這個實驗。


13 則留言:
W大您好,先感謝分享程式碼
目前使用到用NodeMCU將latest版本的韌體燒錄至esp8266
但接下來將tx/rx的檔案燒錄的部分能否更詳細的解說呢
不好意思爬了許多篇文章還是不太理解,我是參考這篇:
https://www.youtube.com/watch?v=Gh_pgqjfeQc
燒錄完成畫面:
http://i.imgur.com/eK4qNtb.png
可以參考這個教學
https://youtu.be/hrjtAYMrxF4
Hi!
thanks for all your amazing info. It's really really usefull!
I have two TTGO boards with OLED display, and I noticed that the text looks big and rare (even in your videos). Maybe it's intentional, but if it's not, change the file "controller_esp_ttgo_lora_oled.py" for resolve that. In line 30, on display height definition the correct value is 64 not 32. Change that line so it looks like this
OLED_HEIGHT = 64
Now a question: I loaded the test program "LoRaDuplexCallback" in two TTGO boards and the first time I execute, works perfect. But I rebooted the boards and Just obtain "Hello!" forever. What could go wrong?
Thanks again!
Greetings from Chile!
Wei版主您好,參考您的文章:
6.1 使用 Raspberry Pi 測試
要先 enable Raspberry 上的 SPI 介面。
RPi 上需安裝:
Python3
sudo pip3 install RPi.GPIO
sudo pip3 install spidev
按照上述的接腳對應方式接線。
由 GitHub 下載 檔案。
將 tx 或 rx 資料夾中的檔案上傳到 RPi 上的某一個資料夾中。
<- 現在由 > GitHub 下載 檔案 ,並沒有 tx 或 rx 資料夾 存在,有改版嗎?
請問 RPi 用的相關程式有那些?如何取得呢? 謝謝!
再請教Wei版主,
文章中ESP32可否以ESP8266-12來實作呢?
以上請教,謝謝
程式有改版,說明剛剛已經調整了,請重新看一下 6.1 節。
可以。
一開始就是使用 ESP-12 NodeMCU 模組做的。
Thank you for info.
I set display height definition to 32 on purpose to keep font large enough for me.
I think TTGO module has bad reset circuit so that the SPI sometimes doesn't work properly after hardware reset. Everythin works fine after software reset though.
This only happened to TTGO module, my other ESP32 modules work just fine.
FYI
https://github.com/Wei1234c/SX127x_driver_for_MicroPython_on_ESP8266/issues/1
For dual channel with RPi, which modules did you use?
One is RPi, two LoRa and ?
It is a "AS1117 5V to 3.3V regulator module" for the two LoRa modules.
Hi sir.
I wired the sx1276 and another MCP3008 which also SPI interface, but got some issue here.
The SPI seems has some collision problem. Can you tell me where can I find the SPI pins setting? I'm trying to use another SPI on Pi which are physical 19, 20, 21.
張貼留言