
Wei Lin
2019-4-2
2019-4-2
[Usage Scenarios]
Read on if these scenarios suit you:
- Use the PC to drive (via bus-converter) I2C / SPI / GPIO / UART interfaced peripheral devices.
- For example, using SPI-interfaced SX1278 LoRa transceiver, send and receive LoRa message packets directly.
- On your PC, simulating the I2C / SPI / GPIO / UART interface objects of ESP32 / Raspberry, in order to develop the peripheral device drivers in the PyCharm environment, you can set breakpoints and inspect variables easily.
- No more "print" to debug, no more repeatedly uploading code to the controller.
[Motivations]
- Need to use some I2C/SPI/GPIO/UART interfaced device with my PC:
- One of my Python projects needs to use a SPI-interfaced device.
- However, there is no external SPI interface available on the PC, therefore comes the bus-converter.
- Bus-Converters selection:
- There are many USB to I2C/SPI/GPIO/UART converters available on the market. FT232H (1 channel) / FT2232H (2 channels) from FTDI and CH341 from WCH ... is popular. FTDI's documentation and development resources are quite complete and relatively easy to develop.
- PyFtdi was chosen to drive FTDI chips, it only depends on PyUSB. In addition, we nee also...
- Drivers for the device:
- Besides communicating with devices via I2C/SPI/GPIO/UART, we also need drivers. We need SSD1306 (Display Panel Control IC) driver to use the OLED display.
- Many of those drivers can be found in ESP8266 / ESP32 / Raspberry Pi communities. They are probably written in (Mico) Python, some can run directly on PC with little or no modification, it saves time to re-use them, but...
- Requires Adapters to convert interfaces:
- These drivers were originally designed to go along with, for example, interface objects such as machine.SPI or spidev.SpiDev.
- They have interfaces different from SPI operation functions provided by PyFtdi, we need Adapters to glue them together.
- Pretend your PC an ESP8266 / ESP32 / Raspberry Pi:
- As long as the device driver can run on a PC, and the SPI interface object it faces has exactly the same behavior of the SPI interface object on the ESP32, then the PC "IS" an ESP32 to the device driver. So in this cases, PC is an ESP32 simulator, at least to the device driver. So, we can...
- Utilize powerful development resources and debugging environment from PC:
- For example, when developing a device driver, you can use PyCharm to set breakpoints and to inspect variables whenever needed.
- No more "print" to debug, no more repeatedly uploading code to the controller.
| FT232H | FT2232H | CH341A |
|---|---|---|
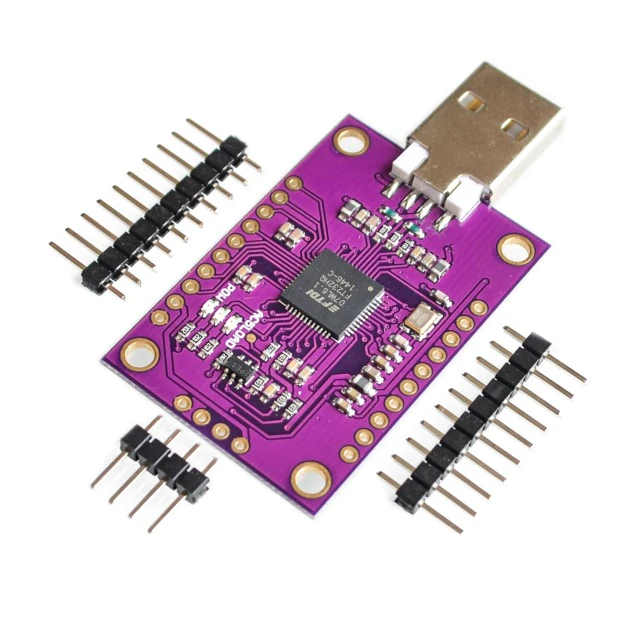 | 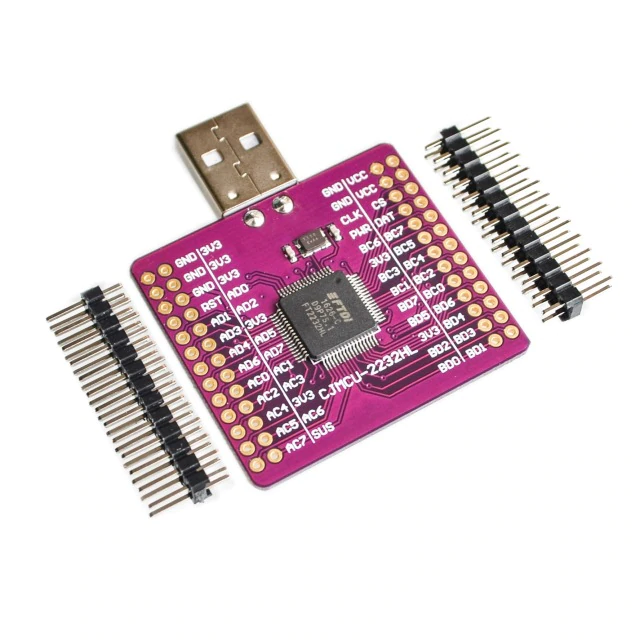 | 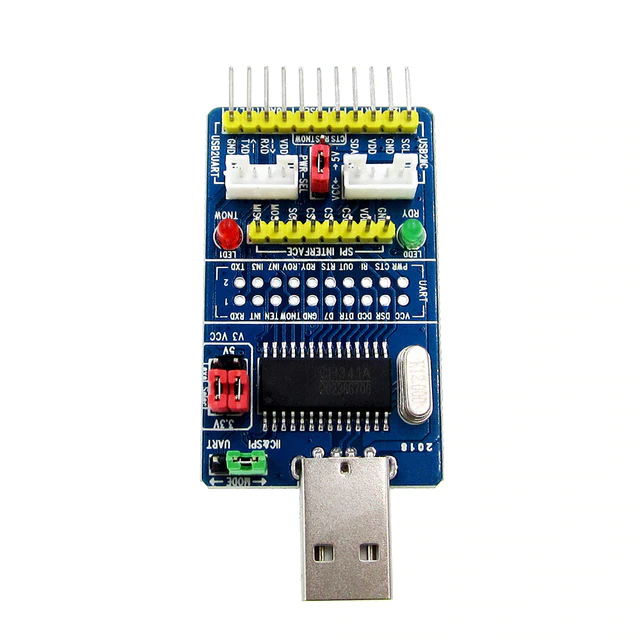 |
[Goals and Features]
- Writing a package to simulate the I2C/SPI/GPIO/UART interface objects for MicroPython+ESP8266/ESP32 and Raspberry Pi on PC:
- Interface objects in MicroPython + ESP8266 / ESP32 environment:
- machine.I2C
- machine.SPI
- machine.Pin
- machine.UART
- Interface objects in the Raspberry Pi environment:
- smbus2.SMbus
- spidev.SpiDev
- RPi.GPIO
- PySerial.Serial
- Interface objects in MicroPython + ESP8266 / ESP32 environment:
- Can drive many bus-converters simultaneously:
- Multiple bus-converters can be connected at the same time, and the number is limited only by the specification of USB and power supply capability.
- Can function under Windows / Linux:
- No modification is required.
- Can be used on PC / Raspberry Pi or any machines that can run PyFtdi package:
- No modification is required.
[How to use]
Simulating for MicroPython + ESP8266 / ESP32
- For machine.I2C
# On ESP32 with MicroPython
from machine import I2C

i2c = I2C(freq = 400000)
# On PC
from bridges.ftdi.controllers.i2c import I2cController
I2C = I2cController().I2C

i2c = I2C(freq = 400000)
- For machine.SPI
# On ESP32 with MicroPython
from machine import SPI

spi = SPI(id, baudrate = 10000000, polarity = 0, phase = 0)
spi.init()
# On PC
from bridges.ftdi.controllers.spi import SpiController
SPI = SpiController().SPI

spi = SPI(id, baudrate = 10000000, polarity = 0, phase = 0)
spi.init()
- For machine.Pin
# On ESP32 with MicroPython
from machine import Pin

p0 = Pin(0, Pin.OUT)
p0.value(0)
p0.value(1)

p2 = Pin(2, Pin.IN, Pin.PULL_UP)
Print(p2.value())
# On PC
from bridges.interfaces.micropython.machine import Pin
from bridges.ftdi.controllers.gpio import GpioController
machine = GpioController()

p0 = machine.Pin(0, mode = Pin.OUT)
p0.value(0)
p0.value(1)

p2 = Pin(2, Pin.IN, Pin.PULL_UP)
Print(p2.value())
- For machine.UART
# On ESP32 with MicroPython
from machine import UART

uart = UART(1, 9600)
uart.init(9600, bits=8, parity=None, stop=1)
# On PC
from bridges.ftdi.controllers.uart import UartController
UART = UartController().UART

uart = UART(1, 9600)
uart.init(9600, bits=8, parity=None, stop=1)
Simulating for Raspberry Pi
- For smbus2.SMbus
# On Raspberry
from smbus2 import SMBus

bus = SMBus(1)
b = bus.read_byte_data(80, 0)
print(b)
# On PC
from bridges.ftdi.controllers.i2c import I2cController
SMBus = I2cController().SMBus

bus = SMBus(1)  # the bus number actually doesn't matter.
b = bus.read_byte_data(80, 0)
print(b)
- For spidev.SpiDev
# On Raspberry
import spidev

spi = spidev.SpiDev()
spi.open(bus, device)
to_send = [0x01, 0x02, 0x03]
spi.xfer(to_send)
# On PC
from bridges.ftdi.controllers.spi import SpiController
spidev = SpiController()

spi = spidev.SpiDev()
spi.open(bus, device)
to_send = [0x01, 0x02, 0x03]
spi.xfer(to_send)
- For RPi.GPIO
# On Raspberry
import RPi.GPIO as GPIO

GPIO.setmode(GPIO.BOARD)
GPIO.setup(6, GPIO.OUT)
# On PC
from bridges.ftdi.adapters.rpi.RPi import GPIO

GPIO.setmode(GPIO.BOARD)  # mode actuall doesn't matter.
GPIO.setup(6, GPIO.OUT)
- For pySerial.Serial
# On Raspberry
import serial
ser = serial.Serial('/dev/ttyUSB0')

print(ser.name)
ser.write(b'hello')
ser.close()
# On PC
from bridges.ftdi.controllers.uart import UartController
ser = UartController().Serial()

print(ser.name)
ser.write(b'hello')
ser.close()
[Test results]
- Breakpoints and variables inspection
- Transceive LoRa packages directly from your laptop
Notes
- Mainly supports FTDI chips for now.
- For CH341A:
- Only I2C and GPIO functions are implemented, no SPI.
- UART can be driven directly with the driver from WCH.
- For CH341A:
- FTDI chip limitations
- No IRQ.
- The FT232H/FT2232H does not have endpoint of "interrupt input" type, IRQ functionality can only achieved with polling, which is too CPU intensive.
- No PWM. PyFtdi, FT232H/FT2232H doesn't support.
- In the same channel, the functionality of GPIO can coexist with SPI, but not with I2C/UART.
- GPIO has no pull-up / pull-down functions.
- No IRQ.