2017年1月21日 星期六

Elastic Network of Things with MicroPython

Elastic Network of Things with MicroPython

Wei Lin
20170120

Abstract


 An IoT system has many nodes, each node with very limited resources and usually needs to be uninstalled to have software modified. Considering an IoT system of 100 nodes, it will be a tedious task to revising them. 

  IPython Parallel is a famous distributed-task-queue framework, I built a small system to demonstrate that we can use ESP8266 modules running MicroPython as Workers(Engines) in a IPython Parallel liked Hub-Workers architecture. In this system we can read/write remote nodes' GPIO pins and control them accordingly in a central-control fashion. We can also send any arbitrary script for remote nodes to execute. Also, script files can be uploaded to nodes and have them start operating autonomously.

 The mechanism described above can be used to deploy and manage an IoT system in a whole new way, in which the functionalities and behavior of nodes can be modified remotely and dynamically,  although they had the identical initial program on installation.
Github Repository


IPython Parallel:
In  IPython Parallel's architecture, a hub is responsible for bridging the communication between worker nodes.  Moreover, with IPython Parallel we can send any arbitrary code for workers to execute. That's impressing. Since we have MicroPython now, why don't we follow this paradigm in building IoT system? It will be far more elastic and powerful !
Just image that we don't need to flash each nodes differently, they all have the same initial code. A system plan will be deployed over the network to each node and modify them accordingly, all at once. Each node and the whole is highly elastic !
photo source


The Devices:
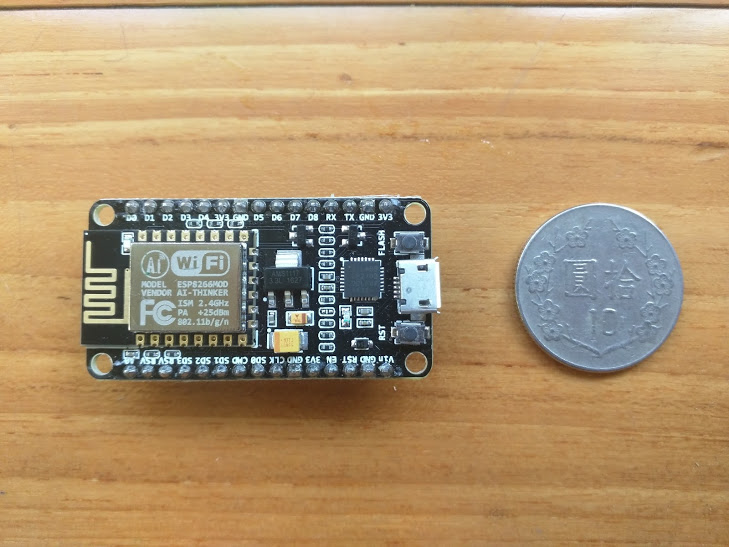
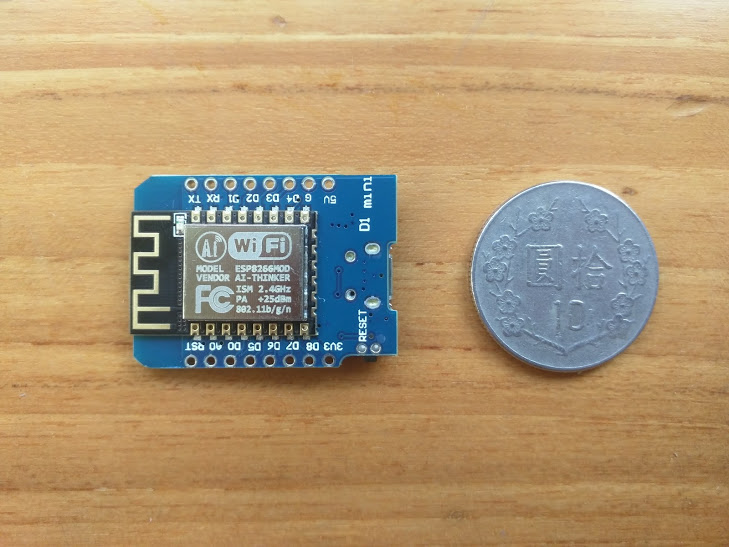
I use  NodeMCU and D1 min
NodeMCU
HTML5 Icon


Experiment Preparation and Setup:

config.py

In this configuration file you only need to set the BROKER_HOST address,ip or domain name will do.
Every node will try to connect the broker after boot, so if the broker has a public ip, then every node will be able to connect it.
Modify the HUB_PORT to 80 if necessary, however not recommended (there are scanners out there).
# filename: codes/shared/config.py

## Must config ******************
BROKER_HOST = '192.168.0.105'
BIND_IP = '0.0.0.0' # the ip which broker listens to.
HUB_PORT = 9662
## Must config ****************


Start the Broker

Run the script below to start Broker. If nodes have already connected the Broker via WiFi network, then you will see a list of nodes' on broker's console. You will need the name list afterward.
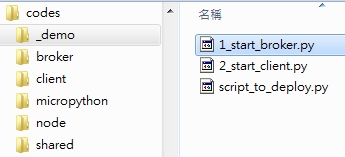
 1_start_broker.py 

Tests:

Read / Write remote GPIO pins

For demonstration, please run the script ` 2_start_client.py `, there are some example messages in the file.
Before running the script, your have to write the names of nodes into the script. There is a list variable for that.


This message will ask remote nodes to blink LED 
messages['blink_led'] = {'type': 'command',
    'command': 'blink led',
    'kwargs': {'times': 10, 'forever': False, 'on_seconds': 0.05, 'off_seconds': 0.05}}
This message will ask remote nodes to return the status of GPIO pins. 
messages['read_GPIOs'] = {'type': 'command',
     'command': 'read GPIOs',
       'need_result': True}
This message will write values to remote nodes' GPIO pins. 
messages['write_GPIOs'] = {'type': 'command',
      'command': 'write GPIOs',
      'kwargs': {'pins_and_values': [(2, 0), (2, 1), (2, 0),]}}
This message will ask remote nodes to evaluate  '2+3' and return result.
messages['test eval'] = {'type': 'eval',
    'to_evaluate': '2+3',
    'need_result': True}
This message will ask remote nodes to execute a statement.
messages['test exec'] = {'type': 'exec',
    'to_exec': 'print("Testing exec !")'}
This message will sent to remote nodes with this function.
client.request(remote_node, message)

Deploy Script file to remote nodes and have them operating autonomously

If needed, a script file can be uploaded to remote nodes and an algorithm  is put inside a  while True loop, so the node will function autonomously and only report to central periodically.
For example, the on board LED will flash continuously  after the following script file was uploaded onto remote nodes.
# filename: codes/_demo/script_to_deploy.py
print('_______ testing remote deploy ______')
print('_______ deployed from remote _______')

import machine
import time

def blink(pin, on_seconds = 0.5, off_seconds = 0.5, on = 0, off = 1):
 pin.value(on)
 time.sleep(on_seconds)
 pin.value(off)
 time.sleep(off_seconds)
def main():
 on_board_led = machine.Pin(2, machine.Pin.OUT) 
 while True:
  blink(on_board_led) # Main logics here.  

# main() will be invoked after this script is uploaded.
main()
We upload the file with just few lines of code below.
with open('script_to_deploy.py') as f:
 script = f.read() 

messages['test upload script'] = {'type': 'script',
      'script': script}

client.request(remote_node, message)

Summary� 

In this mini system, the network of things has highly elasticity. Functionalities and behavior of nodes can be continuously adjusted if necessary.
Also, unlike some cluster system, in this system a node can communicate with other nodes, ask them to execute a function and return value, without client's intervention, thus M2M communication is feasible.

2017年1月19日 星期四

Elastic Network of Things with MicroPython


Wei Lin
20170120

圖 片來源


摘要

 IoT 系統的末端節點通常是由小型的嵌入式設備來擔任,因為節點數量很多,在佈署或改版調整時,需要一個可以由遠端主機動態規劃、佈署、管理與控制的機制,才能 具有省時省力、動態與彈性的優點。
 
 現今有許多 IoT 的 frameworks,都是基於 MQTT 的協定。MQTT 與 AMQP 都是一種 Message Queue 的機制,相關 implementations 都有類似的架構,由一個 Broker(Hub) 對應很多 Workers (Engines) 來組成,CeleryIPython Parallel 都是很有名的應用 Message Queue 的 framework。

 本實驗中基於類似 IPython Parallel 的架構,運用幾顆運行 MicroPythonESP8266 模組,將之視為 Worker(Engine)來建構一個 swarm 型態的小型系統,具有 RPC 的機制,並且受惠於 Python 的特性,可以動態地傳送 任意的程式碼 要求遠端端點執行,因此端點上的運行邏輯隨時可變,並不受限於預設的程式碼。
 
 基於上述的機制,我們可以經由中央主機讀寫各遠端節點上的GPIO來進行動態控制,也可以透過網路佈署程式碼交由 各節點獨立運行,與 IPython Parallel 的 cluster 架構不同的是,各節點  (worker) 雖然很小,但其之間也可以互相溝通,共同建構一個自主、動態的 IoT 系統。    


說明

 Arduino 的出現掀起了一股 Maker 的風潮,它的成功歸功於很多因素,很重要的一點是因為 Arduino 具有相當的方便性,開發模式與環境都相當容易上手,個人覺得具有下列的特色:


Arduino 運作模式的優缺點:

 使用 Arduino 的時候,都會將寫好的程式燒錄到 Arduino 開發板子上,然後 Arudino 即可獨立運作,必要的時候透過 Serial、Bluebooth、WiFi 與外界溝通傳輸資料。 這種模式的好處是:
  • 獨立性高而且相當的穩定,
 但相對的 缺點是:
  • 程式改版很麻煩,需要將機器下線,燒錄新版的程式,再重新上線。
  • 無法容納複雜的邏輯,因為 Arudino 上的記憶體空間有限。
 一方面因為需要容納更複雜的邏輯,另一方面如果機器的數量很多,地理位置分散,更新程式將是費時費力的工作,因而 有了 Firmata 這種混合式的作法。


Firmata 的優缺點:

 Firmata 基本上就是把 Arduino 當作一個 interpreter,接收主機透過 Serial 介面傳來的指令,解譯之後處理之。而主機上有一個對應的代表Arduino的軟體物件,主機與代表Arduino的軟體物件的互動,都將會透過 Serial介面傳遞並指揮遠端的 Arduino實體硬體做對應的動作 (範 例)。
這種模式之下的優點是:
  • 遠端主機可以藉由連線 讀寫硬體機器上的 GPIOs,並做對應的處理與控制,邏 輯上可以更複雜與彈性,遇到邏輯需要變更的時候 能保有相當程度的彈性與方便性。
  • Arduino除了接收並執行遠端主機傳過來的指令之外,也可以以 loop迴圈同時執行固定的工作,具 有某種程度的獨立性
而相對地 缺點是:
  • 如果需要主機讀寫GPIOs並加以控制,則會增加主機的負擔
  • 如果 Arudino 中的 loop 迴圈程式的邏輯需要調整,還是必須要經過 下線、燒錄新版程式、重新上線的過程,仍然逃不過改版費時費力的 宿命。
然而,在 IoT 很熱門的今天,已經不是一兩台設備的規模而已,設備的數量會比較多,之間要怎麼傳遞訊息與資料呢?


MQTT 的角色與特性:

 目前有許多 IoT 的 frameworks,都是基於 MQTT 的協定,基本上是一種 Message Queue 的機制,其中設立了很多 "Topic" (queue),各節點透過定義好的 message queues 來溝通。可惜大部分的 implementations 都沒有提供 RPC 的機制。如果可以具有 RPC 的功能,我覺得會大大地提升 IoT 系統的威力。

Swarm 圖 片來源


ESP8266 可以獨立運作:

 IoT 系統中常用的 ESP8266 是一款相當受到歡迎的WiFi晶片,衍生的模組與可以找到的資 源相當多。
其實 ESP8266 並不是必須搭配 Arduino 才能工作,它裡面其實也有一個 MCU,而且具有自己的 GPIOs、ADC、Serial... 腳位。 有的 ESP8266 模組具有 512KB ~ 4MB 或以上的 Flash,因此,我們可以將程式碼直接燒錄在 ESP8266 模組上面,把它當成一個獨立的個體,用在各種適合的用途上,也就是說,可以把它當成一個具有 WiFi能力的 Arduino 來用


IPython Parallel:

 在上述關於 MQTT 的介紹中我們可以看到,系統是以一個 MQTT broker 為中心,各節點透過 broker 來交換訊息。
有很多 Desigh Pattern 因為很優秀,所以常常可見。MQTT 和 之前淺略接觸過的 IPython Parallel 在架構上都有相似之處。

圖 片來源
 
   
 IPython Parallel 最讓我印象深刻的,也是和 Celery 很大的一個差異點,就是透過 IPython Parallel 可以動態地派送任意的程式碼給遠端的 engine (worker) 去執行,程式碼不用先存放一份在遠端節點上,這讓 IPython Parallel 顯得比較彈性多了。

 能與遠端節點做 RPC 的互動,而且能動態的佈署程式與邏輯到遠端的節點上,我覺得可以是 IoT 系統的兩隻翅膀,有之 應該會具有相當的優勢。我們可以把Arduino 或者 ESP8266 這類的節點視為 Engine(Worker),可以由中央主機統一調度,發派任意的程式碼要求遠端執行。

 但是,要在 Arduino 上面用 C 語言建構這類的平台,至少對我來說是有點不敢想像的。


然 而,現在有了 MicroPython


 之前參加 Taichung.py 的一場 Meetup, 由 Max Lai 解說 MicorPython 的技術應用,內容生動有趣,看到小小的 ESP8266 上居然可以跑 Python 的程式,覺得很神奇,但是一直到最近才有時間動手試試看。


NodeMCU簡介:

 Max Lai 使用的硬體是 NodeMCU ,基本上是一塊 ESP8266-12E 的模組加上 4MB 的 flash 和一些電源與USB-UART的線路所組成,可以用一般的 MicroUSB 線連接到電腦,就可以很方便地與電腦溝通,可以使用 C、Lua、Python (MicroPython 版本) 程式語言開發程式並燒錄到 ESP8266上,網路上可參考的範例很 多。


另外也有 D1 mini ,也是基於 ESP8266-12E,接腳較少但是體積更小巧一點。
HTML5 Icon


Python 與新的運作模式:

 既然現在有了 MicorPython, 在 ESP8266 上面可以實行 Python 的程式,我們是否可以利用 Python 的優勢,在使用 ESP8266 作為 IoT端點 的時候,具有以下的優點:
  • 可如同一般的 Arduino 一樣獨立運作, 不需要外力介入。
  • 也可以採取 Firmata 的模式,由遠端的主機透過過網路讀寫 ESP8266 上的 GPIOs,作相對的處理與控制,邏 輯上可以更複雜與彈性
  • 程式改版方便,可以透過網路即時佈署
  • 可以動態地傳送 任意的程式碼 要求遠端端點執行
  • 各節點可以互相彼此自主溝通。
 ESP8266 是用來作為 IoT端點的絕佳選擇,借助 Python 的優點,希望在建置私有 IoT系統的時候,可以比較方便快速。


實驗性小型系統

 於是,我花了幾天的時間依據 IPython Parallel 的精神, 寫了一個 Hub-Workers 架構的小型系統,把 NodeMCU 和 D1 mini 視為 Engine(Worker),node 之間可以互相溝通,管理者也可以派送任意的程式碼要求遠端節點執行,感覺上這樣方便多了,因為每個節點的行為可以透過網路動態的被調整。


相關準備與設定

config.py

 基本上只需要修改 BROKER_HOST 的位址即可,ip 或 domain name 皆可。
 各節點連上網路之後,會嘗試跟 broker 連線,因此如果 broker 具有 public ip,應該就可以不受防火牆的限制。
 如果需要,HUB_PORT 可以改為 80,有的防火牆只讓 80 跟少數幾個 port 的連線進出。
# filename: codes/shared/config.py
import sys
## Must config ******************
BROKER_HOST = '192.168.0.105'
BIND_IP = '0.0.0.0' # the ip which broker listens to.
HUB_PORT = 9662
## Must config ****************

燒錄 MicroPython 到 NodeMCU 上

設定 NodeMCU 連上 WiFI 網路

 將 MicroPython 燒錄進去之後,Serial 連線進去就會看到 Python 的 prompt >>>
 執行這一行指令就可以了 (SSID 和 password 要填)
 import network; nic=network.WLAN(network.STA_IF); nic.active(True); nic.connect('SSID','password');nic.ifconfig()

上傳基本程式到 NodeMCU

 實驗過程中需要常常上傳 Python 程式檔案到 NodeMCU 上面,所以我寫了一個 IPython Notebook 來自動化
 notebooks/上傳檔案到 NodeMCU (Upload files to NodeMCU).ipynb

啟動 Broker

 都準備好了之後,就把 Broker 叫起來,只須執行
 1_start_broker.py


測試:

對遠端節點讀寫 GPIO

 Client 可以透過網路對遠端的節點做以下的事情:
  • 讀寫 GPIO
  • 傳給遠端節點 一段任意的程式碼並要求節點執行
  • 上傳檔案給遠端節點,檔案若是 Python 程式碼,並可以要求遠端節點 import 並執行
    基於上述的機制,等於是可以做任何 節點的硬體能力範圍內的事情。
    我把一些範例都放在這個程式碼( 2_start_client.py )內,直接執行就可以了,執行這個檔案之前需先在其內設定各節點的名稱。要知道有那些節點,可以查看 Broker 的 console。Broker啟動之後,各節點會自動連上來,在 Broker 的 console 上會有清單。現在已經可以透過 RPC 的機制向 Hub 索取上線節點的名單。


這個訊息,要求遠端節點閃燈 10次。
messages['blink_led'] = {'type': 'command',
 'command': 'blink led',
 'kwargs': {'times': 10, 'forever': False, 'on_seconds': 0.05, 'off_seconds': 0.05}}

這個訊息,要求遠端節點回傳 GPIO pins 的狀態。
messages['read_GPIOs'] = {'type': 'command',
 'command': 'read GPIOs',
 'need_result': True}

這個訊息,要求遠端節點依序 設定指定 pin 的 value (pin 2 代表 on board LED)。
messages['write_GPIOs'] = {'type': 'command',
 'command': 'write GPIOs',
 'kwargs': {'pins_and_values': [(2, 0), (2, 1), (2, 0),]}}


這個訊息,要求遠端節點 evaluate '2+3',並傳回結果。
messages['test eval'] = {'type': 'eval',
 'to_evaluate': '2+3',
 'need_result': True}


這個訊息,要求遠端節點執行一個 statement。
messages['test exec'] = {'type': 'exec',
 'to_exec': 'print("Testing exec !")'}


訊息寫好之後,就要求 client 將之傳送給遠端的節點。
client.request(remote_node, message)


遠端佈署程式,讓節點自行運作

 如果主機很忙,希望節點可以獨立自主運作,那也可把控制邏輯放在一個 while True 的迴圈中,並將程式碼遠端佈署給節點執行,節點就會進入自主運作的狀態 (不過 watch dog 或其他中斷的機制需先設定好)。


例如,我們可以將以下程式碼,遠端佈署給節點執行,這 段程式碼象徵性的會讓 LED閃個不停。
# filename: codes/_demo/script_to_deploy.py
print('_______ testing remote deploy ______')
print('_______ deployed from remote _______')

import machine
import time

def blink(pin, on_seconds = 0.5, off_seconds = 0.5, on = 0, off = 1):
 pin.value(on)
 time.sleep(on_seconds)
 pin.value(off)
 time.sleep(off_seconds)
def main():
 on_board_led = machine.Pin(2, machine.Pin.OUT) 
 while True:
 blink(on_board_led) # 主要邏輯放這邊 

# main() will be invoked after this script is uploaded.
main()


Script 檔案準備好之後,就在 client 端用以下的程式把檔案上傳到遠端節點並令其執行,LED燈就會閃個不停了。
with open('script_to_deploy.py') as f:
 script = f.read() 

messages['test upload script'] = {'type': 'script',
  'script': script}

client.request(remote_node, message)


Summary

 這次實驗藉由 Broker-Workers 的架構,讓在主機上的 client 端可以透過網路讀寫遠端 ESP8266 模組上的 GPIO 並加以控制,並且,可以動態傳遞一段程式碼要求節點執行,節點也可以藉由執行主機交付的迴圈程式而成為一個獨立運作的單元。


 跟 IPython Parallel 不同的是,本系統中的 Client 端並不直接跟 Hub 溝通,Client 端其實是透過一個 local node(worker)來跟其他節點溝通,node 和 node 之間可以溝通,並不需要 client 端的介入。


目前 Client 端雖然可以讀寫遠端的節點,並且可以要求遠端節點執行指定動作並 return 答案,但須再加強介面與功能,後續若有時間再做。 Note 20170127: 已經具有 RPC 的機制,可以呼叫遠端的 function 並透過 asynchonous result 的機制取出傳回值。

P.S.: ESP8266 只有 64(指令)+96(資料)KB 的 RAM,程式能跑起來實在讓人很驚喜,不過可能我程式寫得有點草 過於肥大,有時候程式就會hang住了,不是很好 debug。後來優化之後大幅減少記憶體的耗用,已經相對地穩定了。


參考資料


ESP8266 WiKi
NodeMCU WiKi
A python proxy in less than 100 lines of code
Boards Running MicroPython Asynchronous Socket Programming
ESP8266 first project: home automation with relays, switches, PWM, and an ADC